Keyboard setup
10 May 2025
I recently interviewed a candidate and as a part of his "Teach us anything" section, he showed us all about his custom keyboard. This has sent me down a rabbit hole I never wanted to go down.
I have always struggled with minor pain in my right wrist specifically after a big stint of coding. So it makes sense to start to future proof myself and invest in something that will help me in the long run.
I had admired ThePrimeagen's Kinesis Advantage keyboard for a while, but looking at importing it into Australia, it ends up being close to $1000 AUD.
Searching for other retailers in Australia yields next to nothing. I couldn't even find an ortholinear keyboard, let alone a split one. So this left me with no choice but to go down the custom route.
I spent a few days researching different options and mostly decided that I wanted no part in assembling the smaller components. I have some experience with soldering though, so putting some pins on a microcontroller is no problem.
I found most sites confusing and hard to work out what I needed. I eventually settled on Typeractive, as it seemed popular and had free shipping to Australia. They offered the partially assembled boards I was looking for, and have a reassuring interface showing (almost) everything you need to buy.
I ended up choosing the Lily58. I wasn't yet convinced about layers and less keys so the larger option seemed like a better place to start. The following is what I ended up ordering:
- Lily58 Wireless Partially Assembled PCB × 1
- Lily58 Case × 1
- nice!nano v2.0 × 2
- JWK JWICK Linear Switches × 6
- EZ-Solder Machine Sockets and Headers × 2
- Lily58 Display Cover × 1
- DSA Keycaps × 6 (10 x 1u)
- DSA Keycaps × 1 (2 x 1u homing)
- DSA Keycaps × 1 (2 x 1.5u)
I was actually hoping to go wired, so when it turned up it was kind of apparent it is only meant for wireless (though it does work with both boards powered by USB-C) and I had forgot to order the batteries. These were hard to track down elsewhere without incurring enormous shipping costs. I ended up ordering them from AliExpress, and hopefully they turn up in a few months.
I don't mind the bare case but I think I would have preferred an enclosed option to keep the dust out.
I highly recommend blank keycaps as you will be remapping the layout constantly and it is better to learn to touch type.
Assembly was super straitforward. Just solder the EZ-Solder pins and connect it up.
The nice!nano works with ZMK firmware, and I would recommend going straight to configuring it with code. The docs are great and there are plenty of good examples on the internet.
Layout
Given the drastic change in keyboard I decided it would be a good idea to throw away my QWERTY layout and start fresh. I looked at DVORAK and while I liked it, it ended up being too different and the symbol layout is poor (even Programmer Dvorak doesn't look great to me). There's also a lot of keys placed in places that are really awkward for Vim bindings, and remapping isn't really an option as the keys are intuitively named. Colemak looked good, although again the Vim bindings are awful, but fortunately Colemak DH all but solves this. Keys are all convenient and nicely placed for everything I use and it is somewhat similar to QWERTY so less overhead to learn.
I used a combination of Keybr, MonkeyType and Ngram to learn. I would recommend about a week to get up to speed to at least be functional in a work environment. Once you get past about 30 words per minute the cognitive burden of thinking about where each key is starts to go away. The average person types at about 40 words per minute, so at this point you are already faster than Brian from marketing.
Home Row Mods
Perhaps the biggest surprise to me was how I instantly fell in love with home row mods. This is where you use your home keys as modifiers when held down. I chose to go with the order (out to in) of Control, Alt, Command and Shift and have found that to work well on OSX. Some painful stretches are now gone, namely the OSX screen capture shortcut is now achievable from the home row. Some people report issues where you activate the mod layer when you don't mean to, but I haven't found this to be an issue yet and you can tweak the timings to your personal preference. You can also shift the modifiers to the bottom row so they are less likely to be pressed by accident.
I had been slowly tinkering with the rest of the layout. I moved the symbols around based on some sort of intuitive sense, how often I use them and how easy it is for me to reach them. I don't mind using my pinky, but the top and bottom rows are hard for me so those 4 keys are reserved for the least used. But I could never find the right combination...
Miryoku Layout
The Miryoku layout is a layout designed for minimal keyboards. The default layout conveniently already uses Colemak DH and makes use of homerow mods and several layers to fit everything you need on a 40% keyboard.
I tried to set up all sorts of different places for the symbols but I just cannot go past the Miryoku layout. Everything is so well thought out, I don't really know how I could improve it.
One last thing I found useful was caps word functionality. This is very useful in programming where you often have to type constants and such in all caps. Caps word deactivates when you type a space, tab or punctuation. I bound this as a combo to when both of the shift keys are pressed.
Conclusion
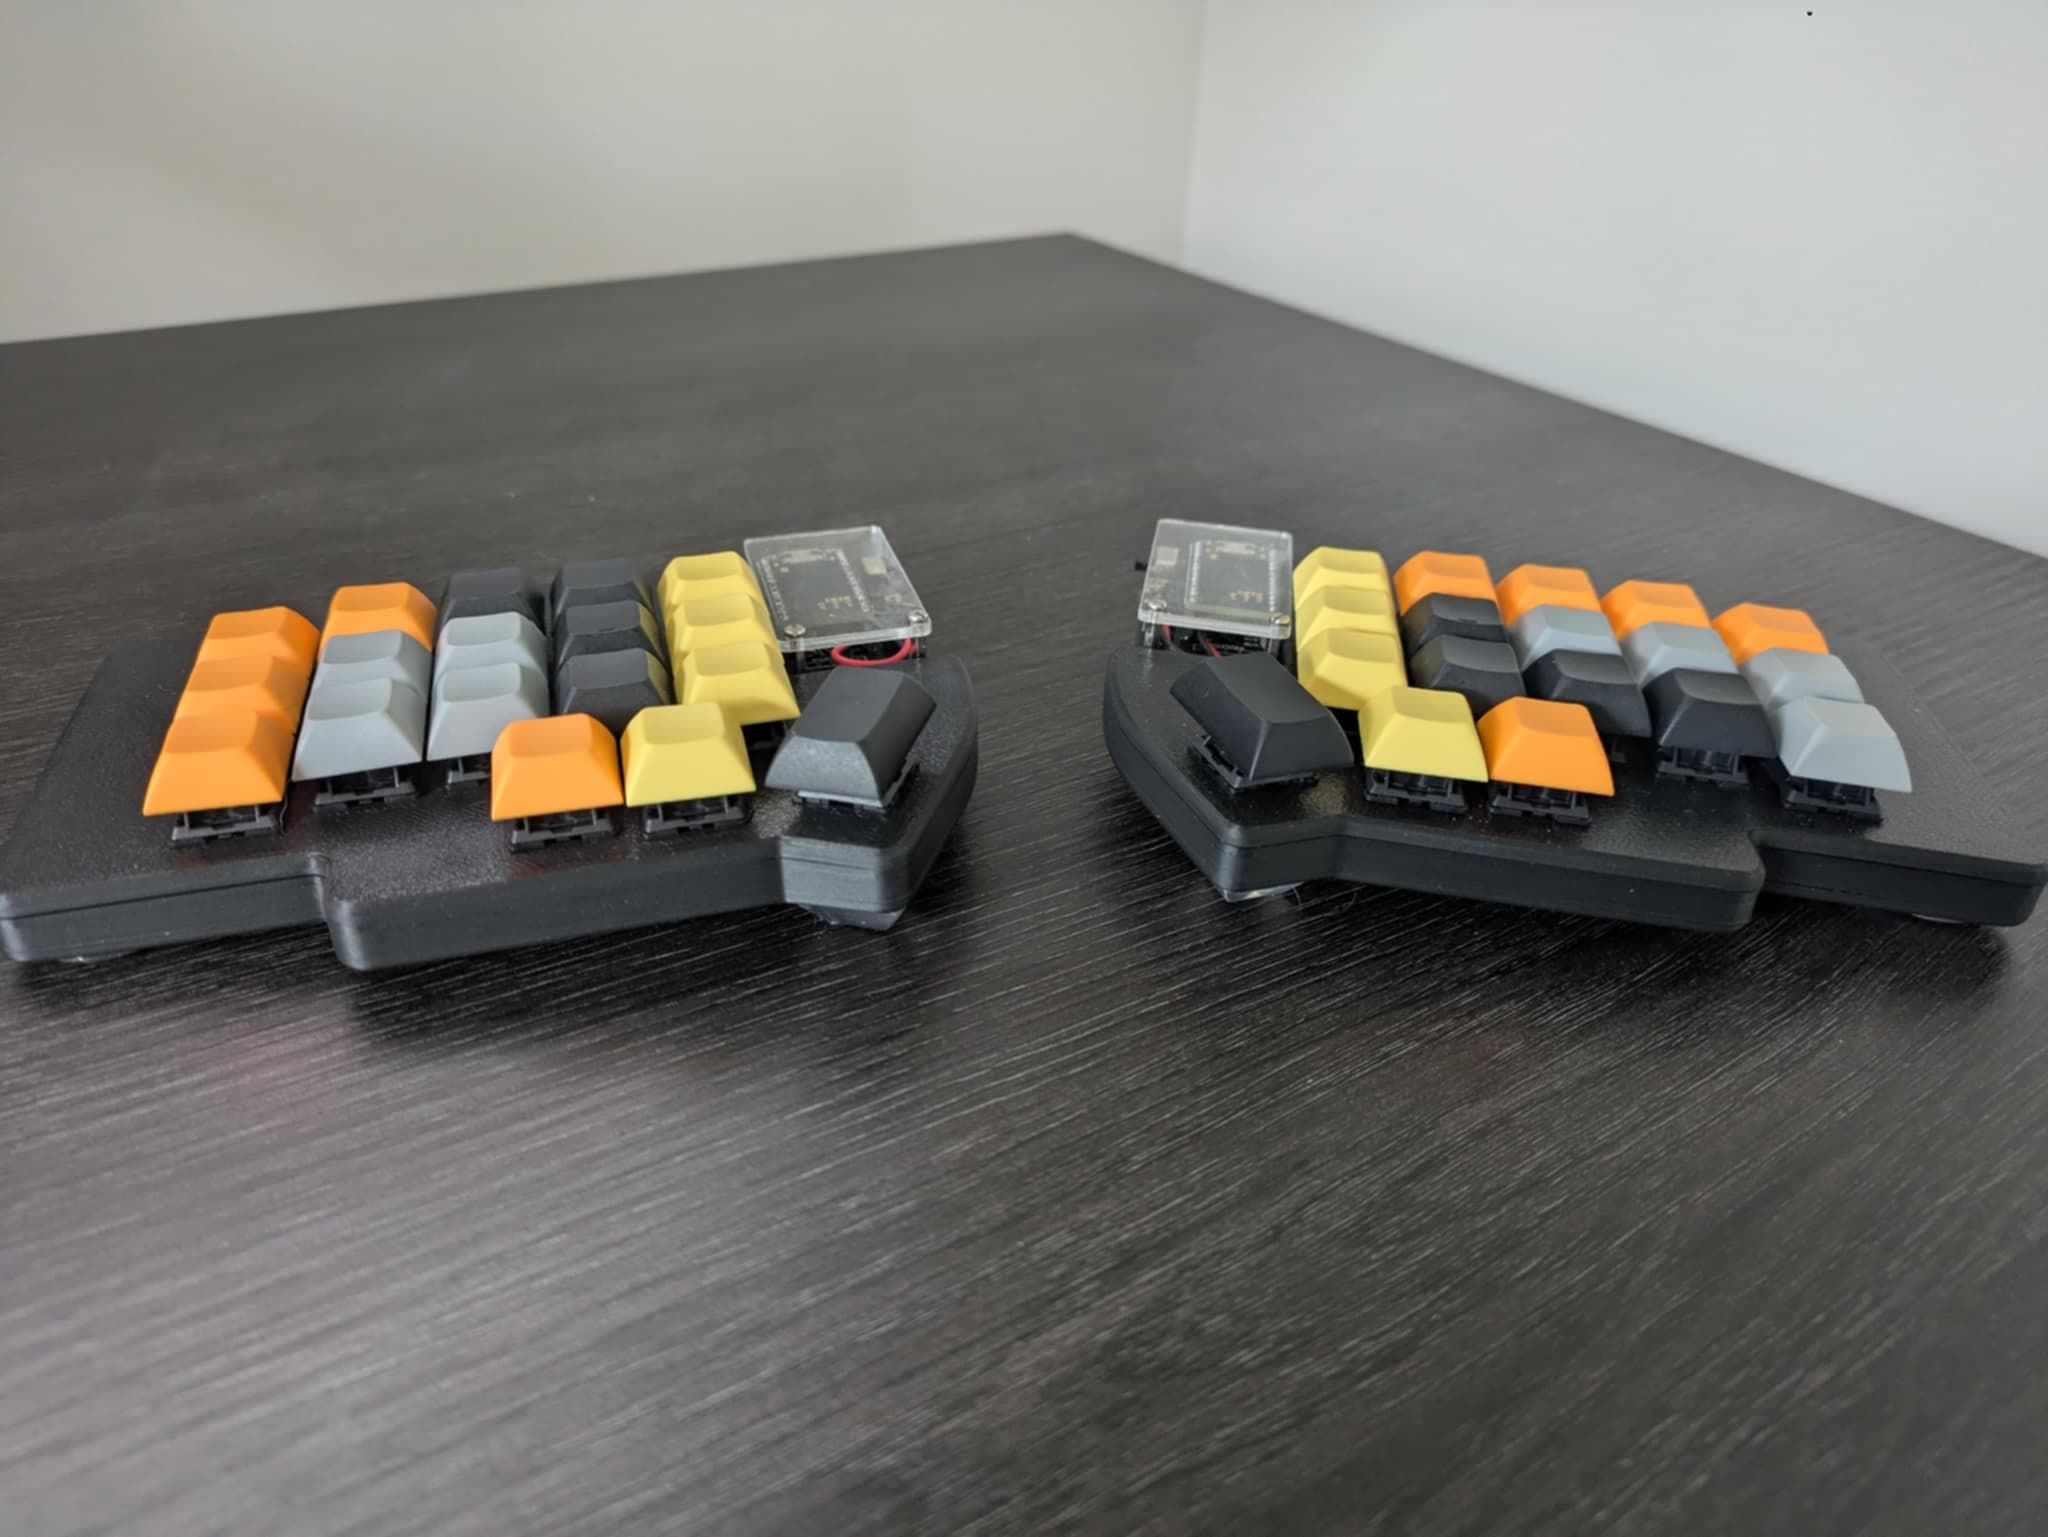
Unfortunately, this means the Lily58 now has too many keys for me, so I will need to buy something else. For now I have made myself the Lily36 by modifying this case and getting someone to 3D print it for me, and I am really happy with the result. Complete with some generic rubber feet to tent it slightly and some coloured keycaps arranged in a tetris theme.
Once I can type a bit faster I will probably try out the 3x5 Corne from Typeractive, which will require switching to choc switches. These LDSA keycaps look like they could smooth that transition out a bit, as I have grown to favour the DSA profile compared to something like a Macbook keyboard.
Overall I am really loving the ability to configure the keyboard to my liking and may never find the perfect layout or the perfect hardware to go with it. The thumb cluster is a no brainer for increasing efficiency and adding the home row mods leaves so much space for everything else. By reducing the amount of keys and moving to a more efficient layout all of the pain I had in my wrists or pinky fingers has completely disappered, which will definitely help me in the long run.
Loading...